Intelligenza artificiale per Jira Service Management

AI-powered support
Whether your goal is to enhance automated support, streamline onboarding, or provide knowledge at your customers' fingertips, Jira Service Management’s AI-powered support workflows are designed to ensure employees receive the assistance they need while simultaneously increasing the productivity of front-line agents.
In this section, we'll walk through how you can use AI in Jira Service Management to:
- Deliver great self-service support experiences
- Accelerate agent & admin productivity
Assistente di servizio virtuale
L'assistente di servizio virtuale di Jira Service Management automatizza le interazioni con il supporto direttamente da Slack per far risparmiare tempo agli agenti e aiutarli a fornire un servizio eccezionale su larga scala.
Esistono due modi principali per configurare l'assistente di servizio virtuale di Jira Service Management, a seconda del tipo e della complessità delle richieste che vuoi automatizzare: flussi di intenti e risposte di Atlassian Intelligence (risposte AI). Puoi utilizzare uno dei due metodi o entrambi per aiutare a deviare i ticket e fornire un'assistenza rapida ai tuoi clienti.
Virtual service agent
The virtual service agent streamlines support interactions across various customer channels, including the Jira Service Management help center, Slack, Microsoft Teams, email, and embeddable widget. This ensures that help-seekers can receive the assistance they need quickly, regardless of their preferred platform.
There are two primary ways to configure the Jira Service Management virtual service agent, depending on the type and complexity of requests you’re looking to automate: intent flows and AI answers. You can use one or both of these to help deflect tickets and deliver fast support to your customers.
Flusso di intenti dell'assistente di servizio virtuale
Gli intenti di un assistente di servizio virtuale rappresentano un problema, una domanda o una richiesta specifici che il tuo assistente di servizio virtuale può aiutarti a risolvere per i tuoi clienti. Ogni intento include una serie di frasi di formazione per aiutare l'assistente di servizio virtuale a riconoscere la richiesta di chi richiede assistenza e un flusso conversazionale che aiuta a guidare chi richiede assistenza nella risoluzione del problema in base alle sue risposte all'assistente di servizio virtuale. Gli intenti sono ottimi per domande che:
- richiedono un lavoro guidato/risoluzione dei problemi
- richiedono la raccolta e la classificazione delle informazioni
- richiedono un'azione automatizzata tramite richiesta web
Esempi: richieste di accesso al software, segnalazione di un imprevisto, nuovo hardware, richieste di approvvigionamento, flussi di lavoro di onboarding.
Gli intenti possono essere facilmente configurati con modelli predefiniti e un editor a basso contenuto di codice/no-code. L'assistente di servizio virtuale utilizza anche l'IA generativa per suggerire intenti pertinenti in base ai dati storici dei ticket di assistenza del team e compilare effettivamente alcune delle impostazioni di base come una descrizione e frasi di formazione.

Risposte AI nell'assistente di servizio virtuale
Le risposte AI utilizzano l'IA generativa di Atlassian Intelligence per effettuare ricerche negli spazi collegati della tua knowledge base e rispondere alle domande dei clienti. Questa funzione è ideale per iniziare rapidamente con l'assistente di servizio virtuale, poiché richiede una configurazione minima ed è particolarmente efficace nel deviare le richieste di aiuto che:
- possono essere risolte fornendo informazioni o istruzioni
- riguardano argomenti trattati (o di cui si può trattare semplicemente) in articoli della tua knowledge base esistenti
- Solitamente non hanno bisogno dell'intervento umano
Istruzioni IT di base come configurazione BYOD, reimpostazione della VPN e connessione al Wi-Fi dell'ufficio
Condivisione delle politiche aziendali come benefit, spese, ferie e altro ancora.

Configura le risposte dell'AI
Per impostare le risposte AI, devi prima configurare i canali di acquisizione dei tuoi assistenti di servizio virtuali. Scopri di più su come eseguire questa operazione nella nostra guida al prodotto per assistenti di servizio virtuale.
Connetti una knowledge base self-service
Una volta definiti i canali di acquisizione, devi assicurarti di avere una knowledge base connessa al tuo progetto, tramite Confluence o la knowledge base integrata di Jira Service Management. Puoi creare la knowledge base direttamente da Jira Service Management o integrare le domande frequenti e i documenti esistenti che già possiedi in Confluence.
Suggerimento avanzato: ricontrolla le impostazioni di autorizzazione della tua knowledge base
Sotto Chi può visualizzare, la visibilità dello spazio della tua knowledge base connessa deve essere impostata su Tutti gli utenti che hanno effettuato l'accesso.
Attivare le risposte AI
Quando la tua knowledge base è pronta, è il momento di attivare le risposte AI nelle impostazioni dell'assistente di servizio virtuale:
Dalla barra di navigazione a sinistra, seleziona Impostazioni progetto > Virtual Service Agent. Seleziona Impostazioni, quindi Impostazioni di base se non è già selezionato. Attiva il pulsante accanto a Risposte di Atlassian Intelligence, quindi seleziona Attiva.
Se stai utilizzando l'assistente di servizio virtuale in Slack, puoi attivare le risposte AI per canali di richiesta Slack specifici. Vai a Canali delle richieste in Impostazioni. Attiva il pulsante sotto Risposte AI accanto al canale delle richieste per cui vuoi attivare le risposte, quindi seleziona Attiva.

Suggerimento: quando si strutturano gli articoli della knowledge base per il consumo da parte degli assistenti di servizio virtuali, tieni presente che al momento le risposte AI non estraggono informazioni dalle immagini e in genere funzionano in maniera ottimale con un testo che non fa parte di una tabella in Confluence.
IA generativa nell'editor dei ticket
Atlassian Intelligence aiuterà anche gli agenti a creare e migliorare le risposte fornite ai clienti, garantendo una comunicazione chiara e ponderata tra le parti interessate. L'IA generativa nell'editor dei ticket può aiutare gli agenti a creare risposte migliori, regolare il tono in modo da essere più professionali o empatici, riassumere un lungo articolo della knowledge base per fornire istruzioni concise e molto altro ancora.
IA generativa per articoli della knowledge base
Oltre all'IA generativa per l'editor dei ticket, Atlassian Intelligence consente agli agenti di creare articoli della knowledge base direttamente da un ticket di Jira Service Management. Fai il brainstorming dei contenuti per un nuovo articolo, assicurati che l'ortografia e la grammatica siano corrette e rendi il tuo articolo professionale ed empatico per i tuoi clienti in pochi semplici passaggi.

Come creare un articolo della knowledge base utilizzando l'IA generativa
Nella visualizzazione ticket di Jira Service Management:
- Dalla barra laterale di navigazione del tuo progetto, seleziona Knowledge base.
- Seleziona Create article (Crea articolo).
- Seleziona lo spazio della knowledge base in cui vuoi creare il tuo articolo, quindi seleziona Avanti.
- Avvia Atlassian Intelligence tramite la barra degli strumenti o digitando /ai nell'editor.
- Scrivi la richiesta desiderata.
- Atlassian Intelligence fornisce una bozza che puoi usare come punto di partenza.
Suggerimenti relativi al tipo di richiesta
I suggerimenti relativi al tipo di richiesta possono aiutarti a eliminare le congetture dalla creazione del tuo service desk suggerendo in modo intelligente i tipi di richiesta in base a come descrivi il tipo di lavoro gestito dal tuo team. Atlassian Intelligence può suggerire tipi di richieste in una vasta gamma di casi d'uso, dall'IT e le risorse umane al catering e alla toelettatura per cani, per poi aggiungerli al tuo service desk con pochi clic.
Una volta creato un tipo di richiesta utilizzando Atlassian Intelligence, puoi inserire moduli e campi aggiuntivi per acquisire tutti i dettagli pertinenti dai tuoi clienti e modificare anche il flusso di lavoro, se necessario.
How to view suggested AI drafts:
Come usare i suggerimenti relativi al tipo di richiesta:
- Vai a Impostazioni progetto > Tipi di richiesta.
- Seleziona Suggerisci.
- Descrivi il tipo di lavoro gestito dal tuo team.
- Seleziona un tipo di richiesta dall'elenco dei suggerimenti di IA, seleziona Crea.
- Conferma il nome, la descrizione, l'icona e il tipologia di richiesta della tipologia ticket.
- Seleziona Avanti e aggiungi il tipo di richiesta a un gruppo del portale.
- Seleziona Crea.
Accelerate agent & admin productivity
Enhance agent productivity by equipping your team with the AI tools they need to deliver great service, fast. Use Rovo agents and embedded AI features in Jira Service Management to prioritize, respond to, and resolve requests.
Ticket triage and prioritization
Jira Service Management offers several AI powered capabilities to help you organize your queue and prioritize the tickets that matter:
1. AI triage
Quickly clean up queues by taking bulk action to intelligently assign work items to the correct request type. By using AI to streamline the triage process, support teams can significantly reduce the time spent on manual sorting, enabling them to resolve high-priority issues more efficiently.
AI triage analyzes tickets in your queue and makes recommendations for appropriate request types and associated fields. This feature can be particularly useful when you receive requests by email and end up with a lot of work items with the “Emailed request” request type.
To use AI to triage work items:
- Select work items in your queue.
- Select Triage.
- Review the suggestions and update request types if necessary.
- Select the work items you want to update.
- Select Apply.
If the suggestions don't match what you need, you can always manually select a request type from the list and continue the bulk update with your own selected request types.
2. Customer sentiment analysis
Get to know your customers better with AI sentiment analysis, which analyzes and interprets the emotional tone of customer comments to help you understand how customers are feeling. Using ticket context like the title, description, and comments, AI assesses the customer sentiment – whether it's positive, neutral, or negative – and displays it directly on the work item view, updating in real-time as new comments come in. By spotting frustrations early, you can provide top-notch service, keeping customer happiness as a top priority.
3. Rovo Agent: Service Triage Assistant
If you want to really supercharge your triaging process, try the Service Triage Assistant, one of our out-of-the-box Rovo Agents. It helps you triage incoming requests by analyzing their content, sentiment, and other details to determine the request type, urgency, and priority. The agent is designed to be used within an automation rule so it can instantly rewrite ticket titles and descriptions, update the priority, or assign request types as work items appear in your queue. It can also determine whether a request should be escalated based on SLAs, customer interactions, urgency, etc.
There are a two different ways you can engage with Service Triage Assistant.
-
Ask questions in the Rovo Chat window: Open the Rovo Chat window in the top right corner of your screen, browse Rovo agents using the Agents menu option on the left side, and select Service Triage. From there you can chat with Service Triage Assistant with prompts like “Suggest a priority” or “Suggest a request type.”
-
Set up an automation rule: Navigate to the automation rule builder and use our pre-built templates to have Service Triage Assistant take automated actions like suggesting priority, suggesting request type, or summarizing the work item.
Pro tip: Try automation mode
When engaging with Service Triage Assistant through the Rovo chat window, try adding “automation mode” at the beginning of your prompt – this allows you to use the agent’s response directly within the automation rule.
Responding to and resolving tickets
Once you’ve sorted your queue and know which tickets to tackle first, use AI to pull critical context into your workflows, helping you respond promptly and take the right steps to get to resolution.
Get up to speed with AI summaries
Rather than reading through numerous comments on a Jira Service Management work item, AI can quickly summarize ticket activity so you can get up to speed, easily loop in new stakeholders or transition tickets to a new agent, and take action.

To use AI summaries:
- From your Jira Service Management project, navigate to your desired work item.
- Scroll down to the Activity section.
-
Select Comments, and then Summarize.
-
The AI-generated summary will only be visible to you, and will disappear when you navigate away from the ticket. You can summarize an issue’s details as many times as you like.
-
Pro Tip: The AI summaries feature works great alongside the virtual service agent. For complex intent flows where the virtual service agent asks multiple questions to gather information from the help seeker before opening a ticket, AI summaries can help the assigned agent quickly digest any issue context the virtual service agent has captured.
Use AI to craft the perfect help-seeker response
AI can help agents quickly draft and edit their response to help-seekers, ensuring clear and thoughtful communication. There are a couple different ways to do this:
1. Draft Replies
This feature uses AI to draft a recommend response to your customers. It allows agents to respond to tickets smartly and efficiently with the appropriate troubleshooting tips or follow-up questions based on comments added by agents while resolving similar requests.

To use AI to draft a reply:
- Open a work item.
- Select Add internal note or Reply to customer.
- Click the Draft a Reply button, select Draft reply from the AI dropdown menu, or simply use /draftreply.
- AI will generate a reply based on responses added by agents while resolving similar work items in the past. You can then insert the comment or refine it.
2. AI editing
Use the AI slash command or the drop down AI menu in the editor to fine tune your customer response, including shortening it, adjusting the tone, and more.
Use cases for generative AI:


Brainstorm
Not sure how to start a customer response? With the brainstorm feature, Atlassian’s Rovo AI analyzes user inputs and generates suggestions for customer responses to inspire and speed up issue resolution.

Make shorter
With the make shorter feature, AI allows you to generate concise summaries of longer responses to customers. This can be useful when you need customers to quickly understand the key points or main ideas.

Summarize
The summarize feature helps agents condense lengthy content into a concise summary, making it easier to understand and digest. AI analyzes the input text and identifies the most relevant and important points. It takes into account factors such as the frequency of certain words or phrases, their context within the text, and any associated sentiment or importance.

Improve writing
The improve writing feature helps agents enhance their writing skills by providing suggestions, including grammar corrections, word choice recommendations, formatting, and more. Alongside the suggested improvements, AI offers explanations and reasoning behind each suggestion as well.

Fix spelling & grammar
The fix spelling and grammar feature in Atlassian’s Rovo AI helps you identify and correct spelling and grammar mistakes in your customer responses. These suggestions are based on common grammatical rules and contextual analysis of the surrounding text. You have the option to accept a suggestion by clicking on it, or you can manually make changes as needed.

Change tone
The change tone feature in allows you to modify the tone of your customer response, enabling agents to adjust the style or mood of the text according to their needs. Available tones include casual, educational, empathetic, neutral, and professional to meet the needs of a variety of customer situations.
Surface critical context and next steps for resolution
AI suggestions
The suggestions panel, located on the right side of any work item view, uses AI to efficiently summarize requests and recommend assignees, pertinent requester details, escalation paths, troubleshooting steps, and more. It also enables you to directly take action from the panel, like updating the priority level.

Similar Requests
Make finding similar requests a breeze by using AI similar requests to find and identify recent requests with similar titles to the one you’re currently viewing in a service project. This feature uses Natural Language Processing (NLP) to provide a list of recent requests with similar titles to the one you’re currently viewing. This AI-automated process of finding related requests reduces the manual effort required to search for similar issues.

How to use AI Similar Requests:
- First make sure you, Enable similar requests panel, start from your service project, select Project settings, then Features.
- Under the Issue view, turn on the Similar requests panel toggle.
- Next, to view similar service requests, problems, changes, and post-incident reviews. Go to the issue you want to find related requests for.
- Select Similar requests or Similar incidents.
- Select Open or Resolved to filter similar requests by status.
3. Rovo agent: Service Request Helper
Another out-of-the-box Rovo Agent, Service Request Helper, provides your team with the insights needed to streamline request management and accelerate resolution times. Designed to use both Atlassian apps and connected third-party apps as knowledge sources, Service Request Helper can gather relevant information and offer guidance on how to resolve requests with speed and precision. Human agents can use Service Request Helper to identify SMEs, compose responses using insights from previous requests, summarize ticket activity, and even recommend next steps.

Like other Rovo Agents, Service Request Helper can be accessed through the Rovo Chat window in the top right corner of your navigation, near your profile icon or avatar. Navigate to any request in your queue, then open Rovo Chat, select Agents, and search for Service Request Helper.
From there you can chat with the Agent, asking it things like:
- What steps should I take next?
- Help me draft a reply to send to the customer.
- Find people who worked on similar requests before.
Empowering admins to get started quickly
AI automations
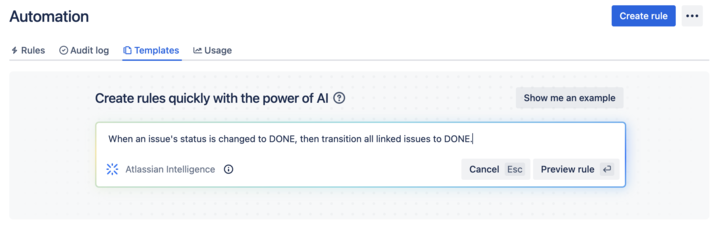
Use AI to generate automation rules by simply describing the rule you want to create in natural language. This feature can be found in the automation rule builder in your project’s settings. Make sure whatever you input includes a trigger and an action.
Request type and field suggestions
Request type suggestions can help take the guesswork out of creating your service desk by intelligently suggesting request types based on how you describe the kind of work your team manages. AI can suggest request types across a range of use cases, from IT and HR to dog grooming and catering, and then add them to your service desk with just a few clicks.

How to use request type suggestions:
- Navigate to Project settings > Request types.
- Select Suggest.
- Describe the type of work your team manages.
- Select a request type from the list of AI suggestions and then select Create.
- Confirm the request type’s name, description, icon, and issue type.
- Select Next and add the request type to a portal group.
- Select Create.
Once a request type has been created using AI, it can suggest relevant existing and custom fields you can add.

AI for IT Operations (AIOps)
Ops Guide agent
The Ops Guide Agent effectively cuts through the clutter by intelligently grouping related alerts and highlighting the most critical ones. Powered by Rovo, the Ops Guide is designed to enhance your management of alerts and incidents, providing historical context and recommending actions to streamline your on-call responsibilities.
By leveraging both Atlassian applications and connected third-party (3P) apps as knowledge sources, it gathers relevant information to offer guidance that helps mitigate the impact of incidents. This approach aims to reduce the time required to detect, respond to, and recover from incidents. With the Ops Guide, you can:
- Run queries for alerts and alert data
- Gather context to resolve incidents more quickly
- Create Post-Incident Reviews (PIR)

AI alert grouping
Accelerate incident detection with AI-powered alert grouping. Separating the signal from the noise is crucial for prioritizing the most significant issues but typically requires a manual effort from on-call teams. We leverage AI to identify patterns among incoming alerts from monitoring and observability solutions so responders can focus on the highest-priority alerts and proactively detect incidents. We also leverage AI to examine past responders or similar past alerts to bring additional context to the surface and suggest next best action.

AI incident creation
Move quickly from alert to incident by leveraging AI to extract information from an alert group and automatically populate an incident record. This includes linking relevant alerts, crafting a concise summary, setting the priority level, and additional information.

AI incident summary and timeline in Slack
Keep incident responders up-to-date with the latest developments directly in Slack. Teams can quickly onboard new responders, minimize time spent looking for details on incident progress, and summarize key actions or decisions made during the incident to accelerate response and help with post-incident reviews.
Teams can also create a comprehensive timeline of an incident by seamlessly integrating key chat messages from Slack channels and updates from Jira Service Management. This provides a chronological record of all critical actions and decisions made during an incident, helping teams trace actions and understand the flow of events towards resolution. Agents can modify which actions appear on the timeline, publish in the associated channel, or as internal comments on the incident record in Jira Service Management.

AI suggestions panel
Incident responders can significantly enhance their resolution speed with access to vital information, including potential root causes (coming soon), recommended responders, and options for actions such as escalation or severity updates. An AI-powered suggestions panel located on the right side of the issue view provides a summary of requests, details about the reporter, priority suggestions, and facilitates direct actions from the panel.

AI PIR Generation
Use AI to populate a post-incident review (PIR) with details from the incident record, alerts, and other sources to save IT Operations teams time after an outage is resolved. PIRs are a core part of the incident management process, helping incident responders and managers learn from recent incidents and pass along insights to prevent similar problems in the future. However, these can be time-consuming and tedious to compile and are often deprioritized, causing organizations to miss out on crucial learnings.
Leveraging AI to draft PIRs saves time finding, summarizing, and publishing key details to help teams grow and learn from every incident.

Similar requests and incidents
With the similar requests panel enabled, you can easily find issues in your service project that are similar to the issues you’re currently working on. The similar requests panel can surface similar requests, incidents, problems, changes, and even post-incident reviews, empowering agents to determine whether there are duplicate issues they can close, previous tickets that will help them resolve issues faster, or similar incidents that warrant a major incident escalation.
The similar requests panel uses Natural Language Processing (NLP) to provide a list of recent requests that have similar titles or descriptions to the one you are currently viewing.
For similar incidents, the results are also AI-powered. To help improve results, you can give feedback by reacting 👍 or 👎 to a result.

To enable or disable the similar request panel:
- From your service project, go to Project settings.
- Select Features.
- Turn on/off the Similar requests panel toggle.
Altre esperienze intelligenti in Jira Service Management
Ricerca nel centro assistenza abilitata per Smarts
Il centro assistenza è il luogo in cui i tuoi clienti si rivolgono per ottenere informazioni e segnalare richieste. Da lì, possono visualizzare il portale per ogni progetto del servizio a cui hanno accesso, cercare i moduli richiesta e gli articoli della knowledge base e vedere le richieste che hanno segnalato nel tempo.

Durante la ricerca nel centro assistenza, Jira Service Management fornisce una potente barra di ricerca intelligente che consente la ricerca avanzata nell'intero portafoglio utilizzando algoritmi basati sui dati e tecniche di machine learning.

La ricerca nel centro assistenza fornisce risorse di auto-aiuto pertinenti dalla tua knowledge base e moduli richiesta sui tuoi portali di servizio identificando il comportamento recente di un utente insieme al suo contesto di ricerca, condividendo le opzioni più pertinenti specificamente per lui. L'aspetto più interessante è che Smarts impara col tempo a migliorare questi risultati predittivi per i tuoi clienti in modo che possano essere più produttivi e ottenere assistenza più rapidamente.
Per personalizzare il centro assistenza:
- Nel progetto del servizio, vai a Impostazioni progetto.
- Seleziona Impostazioni portale.
- Seleziona il link nella sezione Personalizza l'help center.
Articoli della knowledge base pertinenti
Oltre al centro assistenza, l'intelligenza può anche consigliare articoli della knowledge base direttamente dalla Visualizzazione ticket che i tuoi agenti possono condividere con i clienti. Gli articoli della knowledge base pertinenti si basano anche sul contesto del ticket e sul comportamento degli utenti, proprio come nel centro assistenza.

Gli articoli della knowledge base relativi al ticket attuale compariranno nella sezione Visualizzazione ticket e potranno essere condivisi con i clienti con un solo clic. Se un articolo correlato non viene visualizzato, hai anche la possibilità di cercarlo manualmente o crearne uno nuovo a partire direttamente dal ticket.
Assegnazione predittiva degli agenti e delle @menzioni
Infine, collaborare consiste nel coinvolgere la persona giusta al momento giusto per completare un progetto o portarlo avanti. Con i selettori predittivi degli utenti in Jira Service Management, l'intelligenza consiglia un elenco di persone da coinvolgere nel ticket, sapendo con chi lavori regolarmente e di che cosa ti stai occupando al momento. Assegna in modo rapido un agente a un ticket selezionando il campo assegnatario oppure usa @ per visualizzare un elenco di utenti che possono potenzialmente aiutarti a risolvere un ticket.

Imparando dai comportamenti precedenti, l'intelligenza può prevedere i cinque assegnatari più probabili con una precisione dell'86%.